|
How to Login and Enter a Credit Card Payment in VPS |
Users are able to enter a payment using the VPS Web application To Log on – Use the following Link: https://agency.vitalchek.com/vpsweb2/home.xhtml
Link to On-Line Help: https://customers.vitalchek.com/psswebhelp2.0/webframe.html#Payment_Solutions.html
|

| Step 1 |
Upon entering VitalChek Product Suite, the User will be presented with a Enter Security Credentials login page
|
| Step 2 |
Enter User ID
|
| Step 3 |
Enter Password (case-sensitive)
|
| Step 4 |
Click the Login box. If the User attempts to login unsuccessfully 5 times, user will be locked out and will need to reset password 
|
| Step 5 |
After Login, Terms and Conditions window displays, check to agree and click OK to continue to launch VPS |
| Step 6 |
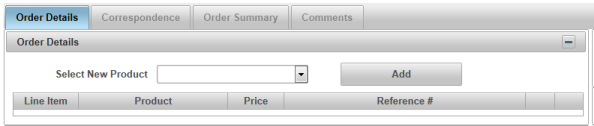
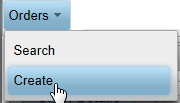
Product information is entered in the Order Details section from the Orders-Create menu item Select Create from the Orders drop down menu
|
| Step 7 |
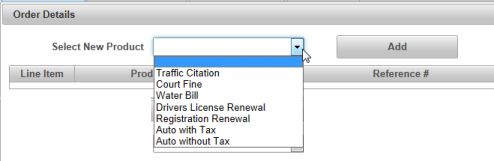
The Order Details tab displays
|
| Step 8 |
Choose the item for payment from the Select New Product drop down selection and click the Add button. Note - Agencies that offer only 1 product will default to the available product.
|
| Step 9 |
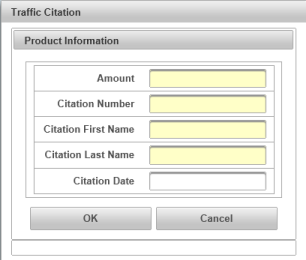
The product information box will display
|
| Step 10 |
Enter the Amount of the payment
|
| Step 11 |
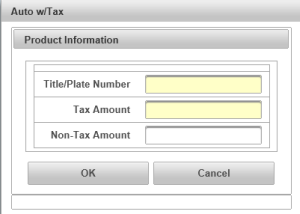
Enter all data fields as required by product and agency Note - agencies that offer a split tax option will enter the tax amount and non-tax amounts
|
| Step 12 |
Click OK button to add Product information to order
|
| Step 13 |
The selected product is added to the order and displays as a line item in the Order Details
|


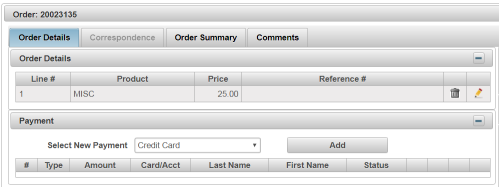
| Step 14 |
Credit Card displays in the Select New Payment field
|
| Step 15 |
Click Add button to add the payment information to the order
|
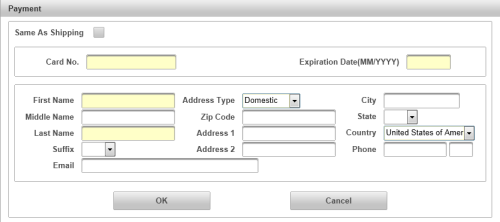
| Step 16 |
Payment screen is displayed for credit card payments
|
| Step 17 |
Check Same as Shipping if the person making the payment is the same as the person placing the order. Checking Same as Shipping will remove name and address information from screen.
|
| Step 18 |
Enter Credit Card No. (number)
|
| Step 19 |
Enter credit card Expiration Date (MM/YYYY)
|
| Step 20 |
Complete all name and address fields. Note - clicking to select Same as Shipping will populate address fields |
| Step 21 |
Enter First Name (or Company Name) of person making payment on the order (credit card holder). NOTE: If the card is listed as the company name (with no individual name), enter the company name listed on the card in the first name field
|
| Step 22 |
Enter Middle Name of person making payment on the order (credit card holder)
|
| Step 23 |
Enter Last Name of person making payment on the order (credit card holder) NOTE: For cards listed as the company name enter the remainder of the company name or X
|
| Step 24 |
Select Suffix of the person making payment on the order (credit card holder)
|
| Step 25 |
Enter email of the person making the payment on the order
|
| Step 26 |
Enter Address Type of the person making payment on the order (credit card holder)
|
| Step 27 |
Enter Zip Code of the person making the payment on the order (credit card holder)
|
| Step 28 |
Enter Street Address of the person making payment on the order (credit card holder)
|
| Step 29 |
Enter additional Street Address of the person making payment on the order (credit cardholder)
|
| Step 30 |
Enter City of the person making the payment on the order (credit card holder)
|
| Step 31 |
Enter State of the person making the payment on the order (credit card holder)
|
| Step 32 |
Enter Country of the person making the payment on the order (credit card holder)
|
| Step 33 |
Enter 10 digit Phone number of person making payment on the order (credit card holder)
|
| Step 34 |
Click Add button
|
| Step 35 |
Credit card payment information is displayed
|
| Step 36 |
Authorize Payment button will display, click to authorize payment
|
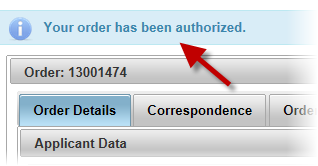
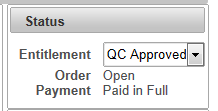
| Step 37 |
Order is authorized and the following is displayed: Authorized message appears: Payment Status changes to Paid in Full:
Payment information in Status section displays Authorized
|