


fhnick
| How to Add a New Payment Profile |
Contains details on VPS Payment Profiles. Note - a Payment Profile must be created before an order can be placed. Users must have a role of Administrator to be able to view and access Administration functions. |
|
|
|

|
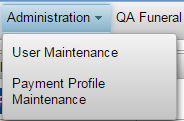
Step 1 |
From the Administration menu, select Payment Profile Maintenance |
|
|
| Step 2 |
Payment Profile Maintenance screen is displayed
|
| Step 3 |
Click Add Payment Profile button
|
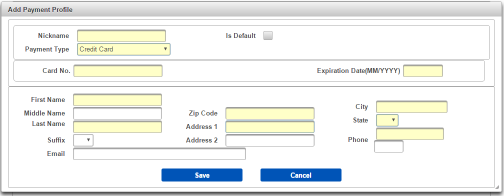
| Step 4 |
Add Payment Profile screen is displayed
|
| Step 5 |
Enter Nickname for Payment Profile
|
| Step 6 |
Check Is Default box to make Payment Profile the default payment method for orders
|
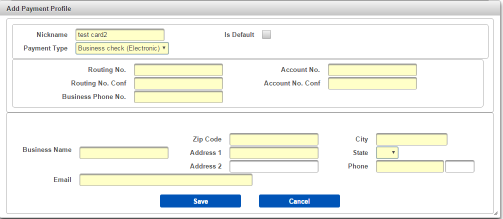
| Step 7 |
Payment Type defaults to Credit Card
Note: Selecting the Business Check option will display the Business Check screen. Enter all Business Check data and proceed to step 9
|
| Step 8 |
Enter credit card number and expiration data Credit Card
|
| Step 9 |
Enter payor First Name
|
| Step 10 |
Enter payor Middle Name (if applicable)
|
| Step 11 |
Enter payor Last Name
|
| Step 12 |
Select a Suffix (if applicable)
|
| Step 13 |
Enter payor Email address
|
| Step 14 |
Enter payor Zip Code. City may auto-populate from Zip Code
|
| Step 15 |
Enter payor Street Address
|
| Step 16 |
Enter additional payor Street Address
|
| Step 17 |
Enter payor City if not auto-populated from Step 14.
|
| Step 18 |
Enter payor State
|
| Step 19 |
Enter 10 digit payor Phone number
|
| Step 20 |
Click Save button to add payment profile
|
| Step 21 |
New Credit Card Payment Profile is displayed in Payment Profile Maintenance screen
|


 See Also
Administration
Payment Profile Maintenance
How to Edit a Payment Profile